
Consider, based a condition you need to create an list of values in OAF, like, show the list of employees / show list of just employee numbers w.r.t the Organization selected by the user. In such cases one may think of creating the LOV dynamically. The below mentioned steps describe the process of creating the same.
Requirement: To create LOV (List of values) item dynamically in OAF
Step 1: Create a new OA workspace and OA project
Create a OA workspace with file name as: CreateLov
Create a OA project with file name as: CreateLov
Default package: oaf.oracle.apps.fnd.lov
Once your project is created, double click on CreateLov project and select Project content.
Click on 'Add' button next to the bottom pane in the Project content and select only that package which you want have in your project.
Click OK and save your project.
Step 2: Create a ADF Business component - Application Module AM
Right click on CreateLov project -> click New -> select ADF Business components -> select Application Module
Package: oaf.oracle.apps.fnd.lov.server
AM Name: LovAM
Check Application Module Class: LovAMImpl Generate Java File(s)
Step 3: Create a OA Components page
Right click on CreateLov project -> click New -> select OA components under Web Tier -> select Page
Package: oaf.oracle.apps.fnd.lov.webui
Page Name: LovPG
Step 4: Set Page properties
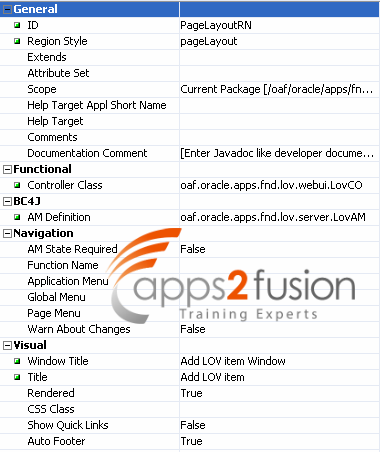
Select on the LovPG page and go to structure pane where a region of type 'pageLayout' and ID 'region1' is automatically created.
Click on region1 in structure page and set the project properties as in the below screenshot - set all the properties except the controller class, for now.
Step 5: Set new Controller
Select PageLayoutRN in the structure pane -> Right click on it -> Set new controller
Package: oaf.oracle.apps.fnd.lov.webui
Controller name: LovCO
-- This automatically sets the controller class property in LovPG page properties
Step 6: Create a ADF Business component - View Object
Right click on CreateLov project -> click New -> select ADF Business components -> select View Object
Package: oaf.oracle.apps.fnd.lov.server
VO Name: LovVO
Keep click 'Next' until you land at step-5(SQL Statement) of VO creation.
Paste the following SQL statement in the 'Query Statement' block as in the below screenshot:
SELECT employee_number, full_name, national_identifier, email_address FROM per_all_people_f
Ensure all the above mentioned column names comes up in the attributes step in VO creation
In step-8(Java) of VO creation uncheck all the pre-selected checkboxes and select View Row Class: ViewObjRowImpl -> Generate Java File -> Accessors check box Accept all other defaults in VO creation, click Finish to create the VO under the package specified.
Step 7: Attach VO to AM
After creating VO successfully, we must associate this VO with AM we have created
Right click on LovAM -> Edit LovAM
Select 'Data Model' on the window that pops up
You should find LovVO listed in the left panel, Shuttle the LovVO to the right pane to associate it with the LovAM which is displayed as LovVO1 as in the below screenshot
Click on Apply and OK to save the changes made to LovAM
Step 8: Create ListOfValues Region list in LovPG
Right click on CreateLov project -> click New -> select OA components under Web Tier -> select Region
Package: oaf.oracle.apps.fnd.lov.webui
Page Name: LovRN
Next right click on LovRN -> Select table using Wizard..
On the wizard that pops up click Next.
-> On step 1 of this wizard select the applciation module as oaf.oracle.apps.fnd.lov.server.LovAM and then select LovVO1 from the available view usages pane, click Next
-> accept the default settings
-> In the step 3 (view attributes) of the wizard select and shuttle EmployeeNumber and FullName attributes to the right
-> Click Next and finish the wizard which creates a table as in the listOfValues region
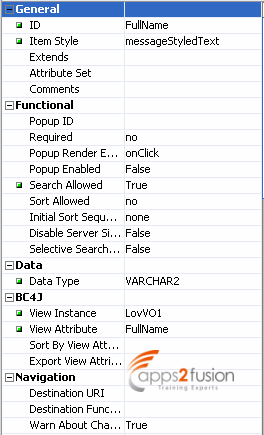
Now, select the FullName attribute from the table created and set its properties as follows:
Step 9: Create LOV item dynamically in LovPG
Add the code in the following Process Request Function in your LovCO
OAMessageLovInputBean full_name = (OAMessageLovInputBean)pageContext.getWebBeanFactory().createWebBean(pageContext, LOV_TEXT, null, "fullname");
//fullname kind of an identifier to full_name object
webBean.addIndexedChild(full_name);
full_name.setAttributeValue(REGION_CODE,"/oaf/oracle/apps/fnd/lov/webui/LovRN");
full_name.setAttributeValue(REGION_APPLICATION_ID, new Integer(20001));
full_name.setLovRegion("/oaf/oracle/apps/fnd/lov/webui/LovRN", 0);
full_name.setUnvalidated(false);
full_name.addLovRelations(pageContext, "fullname", "FullName", LOV_RESULT, LOV_REQUIRED_NO);
// FullName is the ID of FullName attribute in LovRN
full_name.addLovRelations(pageContext, "fullname", "FullName", LOV_CRITERIA, LOV_REQUIRED_NO);
Result:
On page load &
Open the search popup window and click on 'Go' button:
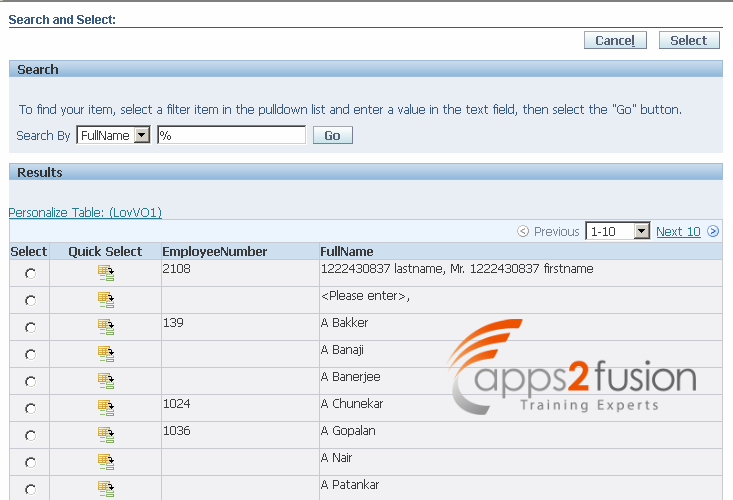
Now in the above screenshot you can see that you have both employee number and full name being shown up according to table created in LovRN. Now select the third entry - A Bakker - and see what gets loaded onto the Lov item created dynamically - the full name should get loaded as we have made FullName as LOV_CRITERIA and in LovCO.


Comments
up new website or even a weblog from start to end.
Feel free to visit my site; borgata casino ac nj (Graciela: https://joeclassifieds.com/index.php?page=user&action=pub_profile&id=2692452)
RSS feed for comments to this post