
Prerequisites
Install SOAPUI form www.soapui.org if you do not have done already.
Objective
This article guides you through the process of creating your first integration. It introduces you to the Integration Cloud Service (ICS) user interface and shows you how to:
Configure connection to a Web Service
Create a simple integration flow
Integrate with simple SOAP-based web services
Map elements between source and target elements
Activate and test the integration
The flow you build follows a simple request/response pattern. A source application issues a request to retrieve data from a target application via ICS and instantaneously receives a response.
Configure the Connection to the Stock Ticker Service
1. Log into ICS Web Console
2. Click on the Designer button to open the Designer Portal
3. In Designer Portal, click on Connections
4. Click on Create New Connection button and select Soap (Web Service) adapter by clicking on the “Select” button.
5. In the New Connection – Information field, specify the information as shown in the below screenshot.

6. Click Create
7. Enter the administrator’s Email Address. For example: This email address is being protected from spambots. You need JavaScript enabled to view it.
8. In the connection details page, click on “Configure Connectivity” and specify the WSDL Location as http://www.webservicex.net/stockquote.asmx?wsdl
9. Click on “Configure Credentials” and select “No Security Policy”
10. Press OK and Click “Test” to test the connection.
11. The status indicator should now show 100%. Press Save to save the connection and exit.
Create the Stock Ticker Integration flow
1. Click the Designer link at the top right corner of the ICS console UI:
2. Click the Integrations link.
3. Click the Create New Integration button.
4. In the screen that follows, pick “Map My Data” Integration pattern.
5. Enter the following information into the New Integration Information dialog box:
|
Field |
Action |
|
Integration Name |
Give a proper Integration name. In may case I am giving Stock_Ticker_A2f_96_138 |
|
Identifier |
Nothing to enter. Automatically generated from the connection name: |
|
Version |
Nothing to enter. Use the default value of 01.00.0000. |
|
Package Name |
Leave it blank |
|
Description |
Leave it blank |
7. Drag the Stock Service Connection icon over the source Trigger area.
8. Fill in the Configure soap Connection wizard page with the following information:
|
Field |
Enter |
|
What do you want to call your connection? |
GetQuoteService |
|
What does this endpoint to? |
Retrieves quote details |
9. Click Next. Select the StockQuoteSoap Port and accept the default Cloud operation name.
10. Click Next to review and then click done.
What you just modeled serves as the web service interface for the integration flow so that external applications can
invoke this integration flow over HTTP.
11. Drag the Stock Service (e.g. Stock Service_49_138) icon over the target Invoke area.
12. Fill in the Configure soap Connection wizard page with the following information:
What do you want to call your connection? GetQuote
What does this endpoint to? Retrieves quote details
13. Select the StockQuoteSoap Port and GetQuote cloud operation name.
14. Click Next to review and then click done.
15. Now the source and target are configured. The target SOAP Service is the actual web service endpoint.
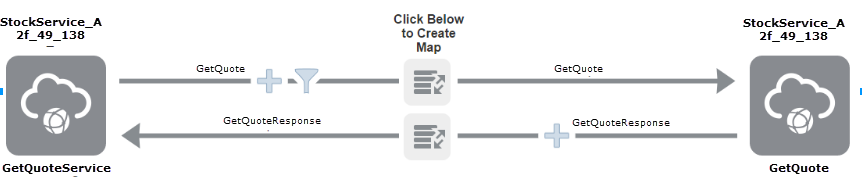
16. Next, map the message received from the source to a form that the target web service understands. This is achieved
through data mapping. To model this click on the Request Mapping button to invoke the mapper.

17. Map the following source field to the corresponding target field. Drag the source field over the target field, aligning
the text of the source field with the text of the target field. When the mapping is successful, the UI looks like this:
18. Save the map and exit the mapper.
19. Map the response message. Click on the Response Mapping button to invoke the mapper.
20. Map the following source field to the target field.
Map the GetQuoteResult Field on the source side to GetSourceResult on the target side.
Drag the source field over the target field, aligning the text of the source field with the text of the target field. When
the mapping is successful, the UI looks like this:
21. Save the map and exit the mapper.
22. Click on Tracking link and drag and drop GetQuote->Symbol field from the payload on to the empty field and save.
Enter the value Quote for Tracking Name field. Now the integration is 100% completed.
Click Done. And Save the Integration
Note that Flow Progress Indicator shows that the integration is 100% complete.
24. Click Exit Integration
25. Observe that integration status is shown as ready to activate
26. Check Enable detailed tracing option. Click the Activate button to activate the integration.
27. Note that the integration status is shown as “Active”.
28. Click on the Info icon to verify that the Generic Web Service inbound SOAP endpoint is up and running. Note that
the endpoint URL you see may be different from what you see below. Copy the end point URL.
29. Open SOAP UI. If you do not have SOAPUI installed, install it from http://www.soapui.org/.
30. Create a new SOAPUI Project
31. Provide the following details:
Provide name to the project Paste the WSDL url copied earlier. It is the end point URL from the service.
Add an authorization header as shown below.
1. Click on Auth tab in the SOAP UI
Select Basic Auth and select OK
Enter the following details. ICS Username and password
Double click on GetQuote\Request1 and put in the ticker symbol ORCL in the <web:symbol> element text . Add the WSS
username token and WSS timestamp by right mouse click in the payload window and select the following values and run
the test.
32. You should see the response in the target area.
Summary
This tutorial guided you through the process of creating simple web service integration. The lab introduced you to the ICS
user interface and showed you how to:
Configure connection to a simple Web Service
Create a simple integration flow
Integrate with simple SOAP-based web services
Map elements between source and target elements
Activate and test the integration


