Objective:
This article covers how to install Oracle Entitlements Server (OES) 11g, release 2, including the OES Administration. This also covers how to create a sample Oracle WebLogic Server (WLS) domain that is OES -enabled.
Oracle Entitlement Server (OES) is a fine grained authorization engine from Oracle and is part of Oracle Identity Management Suite.
Software Required for OES 11gR2:
There are two parts of OES:
-
Server side component(OES Administration console or Authorization policy manager-APM)
-
Client side component (Security Module-SM): There are various different types of security module (OES client side components). Weblogic security module is most common hence we are going to do the installation and configuration in Weblogic SM series.
In order to install OES 11gR2 server side component, you would need following softwares:
-
Oracle Database (10.2.0.4+ or 11.1.0.7+ or 11.2.0.1+)
-
JDK (1.6.29+)
-
Oracle WebLogic Server (10.3.6 or 10.3.5)
-
Oracle Repository Creation Utility RCU (11.1.2)
-
Oracle Identity & Access Management Software (11.1.2)\
In order to install OES 11gR2 (11.1.2) client side component (WebLogic Security Module), you would need following software:
-
Oracle WebLogic Server
-
OES Client Software
OES Installation steps:
1. Install Database: This database will be used to create OPSS schema to store Authorization Policies. OPSS : Oracle
platform Security Services. For Database installation steps click here
2. Create OPSS schema using Repository Creation Utility(RCU). For RCU installation steps click here.
NOTE: Select Oracle platform security services and Metadata Services from list of available schemas.
3. Install JDK 1.6
NOTE: JDK will be used to install WebLogic in next steps and also to run Application on Java Virtual Machine (JVM).
4. Install Weblogic server:
NOTE: You must install Identity & Access Management Software (this also contains OES software) inside
MW_HOME.
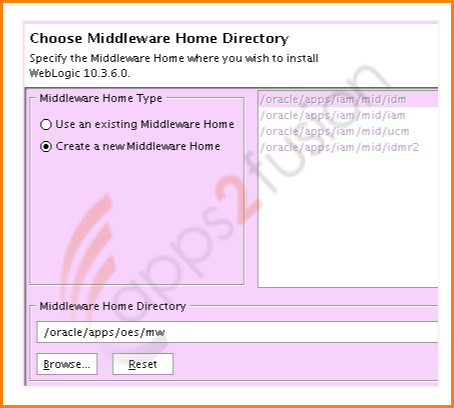
5. Install Oracle Identity and Access Management(OIAM) software:
runInstaller -jreLoc <Location_of_JDK
Note: When prompted for Middleware Home, provide directory that you used for Middleware Home in previous step.
This step will create ORACLE_HOME containing OES software.
After installing the softwares, next step is to configure Weblogic Domain that will host Oracle Entitlement server(OES) Administration Console (also known as Authorization Policy Manager-APM).
NOTE: OES Administration Console (aka APM) is used to manage (create, modify, delete) policies.
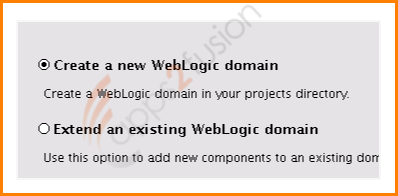
6. Run Fusion Middleware configuration wizard to configure Weblogic Domain.
1] Start Weblogic Domain creation Screen at
$ORACLE_HOME/common/bin/config.sh and select Create New WebLogic Domain
2] Now select the following Templates:
a) Oracle Entitlement Server for Admin Server (This will deploy APM application on WebLogic Admin Server) and
b) Oracle Enterprise Manager (This will deploy EM application on WebLogic Admin Server)
NOTE: Installer will automatically select Oracle Platform Security Service (required by OES Admin Server) and Oracle JRF (required by Enterprise Manager).

3] Select WebLogic Domain directory – This directory will contain all WebLogic Server related Configuration and run time files.
NOTE: WebLogic Domain Directory can be anywhere on server and need NOT to be inside middleware home (MW_HOME).
4] Provide OPSS schema details that you created while installing OPSS schema.
Note: This OPSS schema will hold OES policies and WebLogic domain related application policies.
5] Select WebLogic Administration Server and Managed Server
NOTE: There will not be any managed server for OES
Now before migrating the weblogic Domain security store(containing applications, policies and credentials) from XML files to Database in (OPSS schema).
$MW_HOME/oracle_common/common/bin/wlst.sh $ORACLE_HOME/common/tools/configureSecurityStore.py
/oracle/apps/oes/mw/oracle_common/common/bin/wlst.sh /oracle/apps/oes/mw/iam/common/tools/configureSecurityStore.py -d $DOMAIN_HOME -t DB_ORACLE -j cn=jpsroot -m create -p welcome1
Here,
a) ORACLE_HOME is /oracle/apps/oes/mw/iam
b) MW_HOME is /oracle/apps/oes/mw
c) Replace $DOMAIN_HOME with complete path of your WebLogic Domain Directory
d) welcome1 is password of OPSS schema
Once this is done, the output can be seen as,
Credential with map Oracle-IAM-Security-Store-Diagnostics key Test-Cred stored successfully!
Credential for map Oracle-IAM-Security-Store-Diagnostics and key Test-Cred is: GenericCredential
Info: diagnostic credential created in the credential store.
Info: Create operation has completed successfully.
Start WebLogic Admin Server (More on WebLogic Server Start-up here)
$DOMAIN_HOME/bin/startWebLogic.sh (When prompted, enter user weblogic and password you supplied during
domain creation)
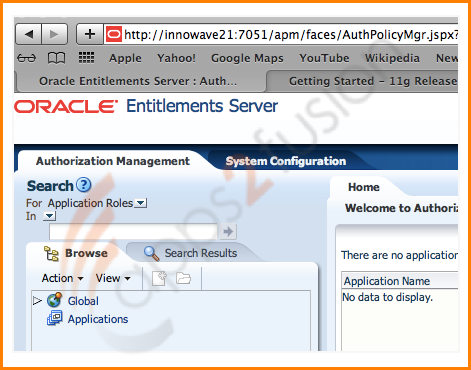
6] Access OES Administration Server Console (Authorization Policy Manager – APM)
http://hostname:admin_server_port/apm
NOTE: Here admin_server_port is the port that you configured during WebLogic Domain creation step
Login using
User ID- weblogic
password- which you have entered during WebLogic Domain Creation Step.