
Introduction
Most of us must be used to receiving our Credit Card statements, Bank Account Statements, Increment Letters, Promotion Letters, Compensation Letters and many such sensitive documents as an email attachment which are password protected. Not sure whether some of you ever gave a thought of how the same were generated or how easy or tough it is to get such a feature incorporated.
While am not aware of how the same was achieved in a traditional ERP Application (EBS / PeopleSoft /JD Edwards) but the same can be easily achieved in Oracle Fusion Cloud Application.
In this article we will try to demonstrate the same with a worked out example of the same. So without further delay let-us get started.
Worked Example
We would need to create a very simple Data Model for the same. Let us say we want to create display the following columns in the Report(say Compensation Detail Report)
|
Compensation Detail Report |
|
|
Column 1 |
Employee Number |
|
Column 2 |
Employee Name |
|
Column 3 |
Annual Salary in USD |
|
Column 4 |
Bonus Percentage |
For the sake of simplicity, we would prepare a very simple SQL as below
|
SQL Query |
|
SELECT 1 as EmployeeNumber, 'Alfred Thomas' as EmployeeName, 10000 as AnnualSalaryinUSD, 10 as BonusPercentage FROM dual UNION SELECT 2 as EmployeeNumber, 'Barack Alfonso' as EmployeeName, 20000 as AnnualSalaryinUSD, 20 as BonusPercentage FROM dual UNION SELECT 3 as EmployeeNumber, 'Chris Matthew' as EmployeeName, 30000 as AnnualSalaryinUSD, 30 as BonusPercentage FROM dual UNION SELECT 4 as EmployeeNumber, 'Derek Laker' as EmployeeName, 40000 as AnnualSalaryinUSD, 40 as BonusPercentage FROM dual |
Creating Data Model
Next we would need to create a Data Model in Fusion Application based on above SQL.
As a first step we would need to login to the application with appropriate credentials (in this case hcm_impl)
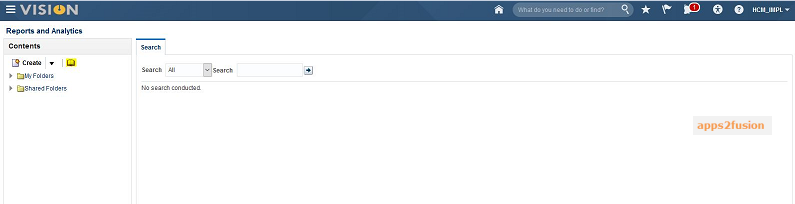
Once we click on the ‘Sign In’ button this would take us to the Home Screen where from we are supposed to click on the Navigator icon and choose the ‘Report and Analytics’ link under the Tools option
This would take us to a new screen where we are supposed to click on the Book Icon (referred to as ‘Browse Catalog’)
A right click on the icon will take us to the BI Catalog where we need to choose the New->Data Model option
As soon as we click on the ‘Data Model’ a new window would open and we need to select ‘SQL Query’ under the Diagram tab, as the New Data Set Option
Next we need to populate the following details in the popup window
|
New Data Set – SQL Query |
|
|
Attribute Name |
Attribute Value |
|
*Name |
CompensationDetail_ds |
|
*Data Source |
ApplicationDB_HCM |
|
*Type of SQL |
Standard SQL |
|
*SQL Query |
SELECT 1 as EmployeeNumber, 'Alfred Thomas' as EmployeeName, 10000 as AnnualSalaryinUSD, 10 as BonusPercentage FROM dual UNION SELECT 2 as EmployeeNumber, 'Barack Alfonso' as EmployeeName, 20000 as AnnualSalaryinUSD, 20 as BonusPercentage FROM dual UNION SELECT 3 as EmployeeNumber, 'Chris Matthew' as EmployeeName, 30000 as AnnualSalaryinUSD, 30 as BonusPercentage FROM dual UNION SELECT 4 as EmployeeNumber, 'Derek Laker' as EmployeeName, 40000 as AnnualSalaryinUSD, 40 as BonusPercentage FROM dual |
The UI screen when populated would appear as below:
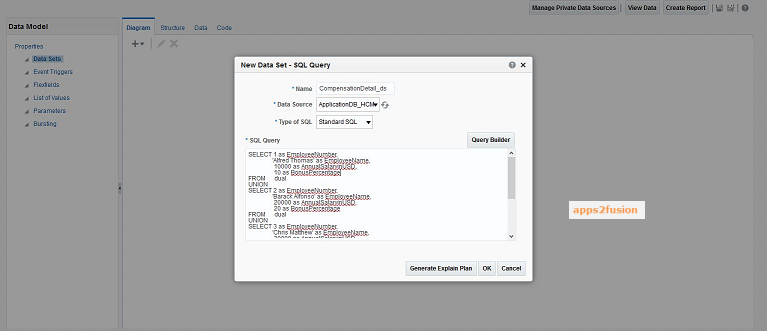
We need to click on ‘OK’ button and the Data Model would appear on the window.
Next we need to click on either the ‘Save’ / ‘Save As’ option (Floppy Disk Icons on top right hand side .. highlighted using yellow color on previous screenshot) and save the Data Model with an appropriate name (say CompensationDetail_dm) at a proper location.
We should now click on the Data followed by ‘View ’ which would show us the Data in XML format. And once we click on ‘Save as Sample Data’ a confirmation message would be displayed stating that the same has been ‘Saved as Sample Data’
Creating Report from the Data Model
We may now click on ‘OK’ button and proceed to creating a report from this data Model. We would need to click on ‘Create Report’ button (present on top right hand side of screen). This would open up the below screen:
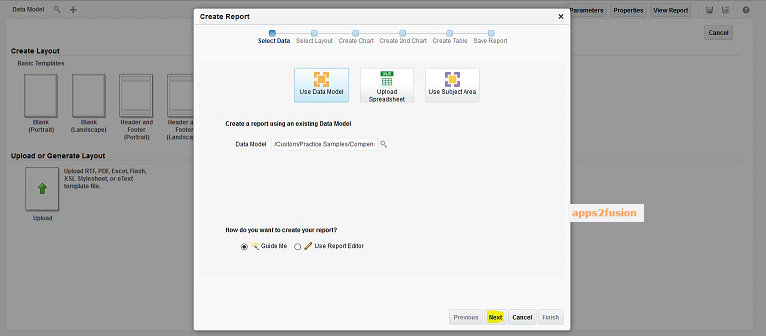
We should now press the ‘Next’ button and use the default values of ‘Page Option’ as ‘Portrait’ and Layout as ‘Table’ and click on the ‘Next’ button again
In the next step we should choose the column and their arrangement and once done click on the ‘Next’ button
This would take us to the next screen where we can click on Finish Button
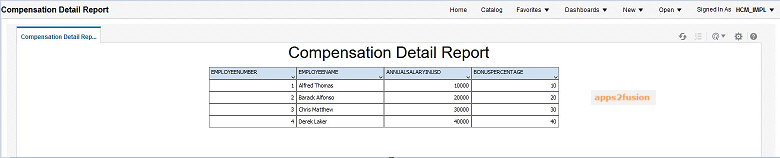
Once we click on ‘Finish’ we would be asked to save the report. We would do so by giving a name to report (Compensation Detail Report for this example) and save the same.
With this the Report creation is complete and we should be able to view the report on the screen
Securing the Report Output with a Password
But this is a Compensation Related Report containing sensitive data and we would like to have the same password protected (so that only authorized individual should be able to access the same). For this we would first ensure that the default format of the Report is set to PDF. This is done by selecting the PDF option from the ‘View Report’ drop down list available on top right hand side
Once we make the change we could see the report in PDF format
But still we have not been able to secure the PDF output with a password. And that is because we have not yet set the properties of the Report.
For this we need to perform the below steps:
-
Click on Edit Report
-
Click on ‘Properties’ button
-
Navigate to Formatting Tab
-
Set the ‘Enable PDF Security’ Property to ‘True’ and add a value for the ‘Open document password’ property
-
Click on ‘OK’
Now if we click on the ‘View Report’ button we should be prompted for a password
Entering an incorrect value would show us a message 'Invalid Password. Please try again.'
The file would only open when we provide a correct password
Scheduling the Report
We may even verify that the Report behavior remains same when we schedule the same.
Now once we click on the Report File Name (Output1)
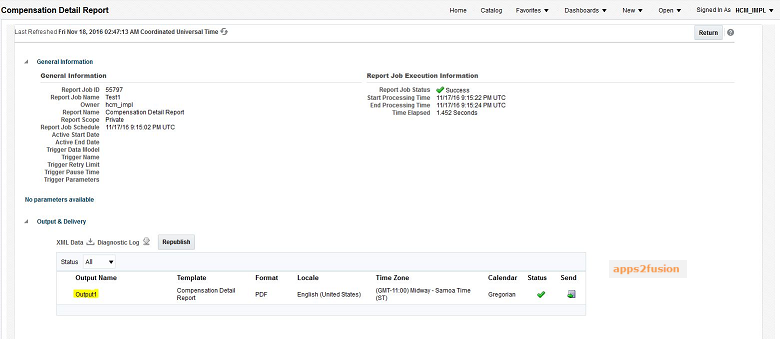
We would be prompted for a password
Inference / Conclusion
So this is how we can secure the PDF output. We may even use this feature for outbound integration (referred as HCM Extracts) where-in we need to set the same property for the Report which would be attached to the HCM Extract Delivery option.
Hopefully this was an interesting read and you guys were able to learn something out of it.
Do try it at your end too and share if you have any new observations and findings.
That’s all from my side and have a nice day……


Comments
RSS feed for comments to this post