Objective:
In the previous article we learned how to upgrade oracle EBS R12.2.0 to R12.2.4. In this article we will learn about the Cloning of R12.2.4 and User creation.
Cloning R12.2.4:
1. Source Application Env on run edition
2. Run fs_clone
3. Run Autoconfig on Appstier
4. Synchronize Appsutil on database node through admkappsutil.pl utility
a. On the application tier:
i. Run EBSapps.env.
EBSapps.env RUN
ii. Create the appsutil.zip file by running the following command:
$ perl <AD_TOP>/bin/admkappsutil.pl
This will create appsutil.zip in <INST_TOP>/admin/out.
b. On the database tie:
i. Copy the appsutil.zip file to the RDBMS ORACLE_HOME, then run the following
commands:
ii. $ cd <RDBMS ORACLE_HOME>
$ unzip -o appsutil.zip
5. Runautoconfig on DBtier
6. Update current view snapshot through adadmin utility
7. Run preclone on appstier
Log on to the primary node of the Source System as the applmgr user.
Source the environment file of the Run Edition File system.
Execute the following commands:
$ cd <INST_TOP>/admin/scripts
$ perl adpreclone.pl appsTier
8. Run preclone on dbtier
Prepare the Source System database tier for cloning
a. Log on to the Source System as the oracle user.
b. Source the Database tier environment file.
c. Execute the following commands:
$cd <RDBMS ORACLE_HOME>/appsutil/script/<CONTEXT_NAME>
$ perl adpreclone.pl dbTier
9. Shutdown Application & Database Services
10. Copy database file from source to target system
11. Copy database file from source to target system
12. Copy Application run-edition file system from source system to target system
Donot copy FMW_Home, inst files
13. Configure the Target System Database Tier
$ cd <RDBMS ORACLE_HOME>/appsutil/clone/bin
$ perl adcfgclone.pl dbTier
14. Configure the Target System Application Tier
$ cd <COMMON_TOP>/clone/bin
$ perl adcfgclone.pl appsTier
15. Run adpreclone on Target Run file system
$cd $ADMIN_SCRIPTS_HOME
$ perl adpreclone.pl appsTier
16. SHUTDOWN THE APPLICATION which is running on RUN FILESYSTEM
17. COPY THE TARGET RUN FILESYSTEM to TARGET PATCH FILESYSTEM
Only EBSapps
18. UNSET the application Enviroment.Previously
19. Before we run adcfgclone.pl dont run any env's, Directly go to
/u02/apps/fs2/EBSapps/comn/clone/bin/ and execute adcfgclone.pl
$ cd /u02/apps/fs2/EBSapps/comn/clone/bin
$ perl adcfgclone.pl appsTier
Target System File Edition type [run] : patch
Once done everything. Start the application Tier using adstral.sh
User Creation
Url : http://icm.oracle.com:8000
Login Page
Enter the login username and password
Responsibility: System Administrator Security user define
Enter user name & password(Enter password two time).
Add responsibility to user.
Click on save button.
Now login with Noor Hassan User
Click on Login
Enter current & new password
How to Create Menu
Responsibility: System AdministratorApplicationMenu
Main Menu> System administrator> Application> Menu
Enter the following Information
1. Enter Menu Name ICM_TEST_GL_MENU
2. Enter the Submenu Names
3. Save
How to create Request
Write simple select query
Select ledger_id from gl_ledgers;
Save it as ledger_sql.sql
Copy this sql script to location on the server
/u01/oracle/PROD/apps/apps_st/appl/gl/12.0.0/sql
Create executable for this script in Oracle APPS
Responsibility: System AdministratorConcurrentProgramExecutable
Click Executable
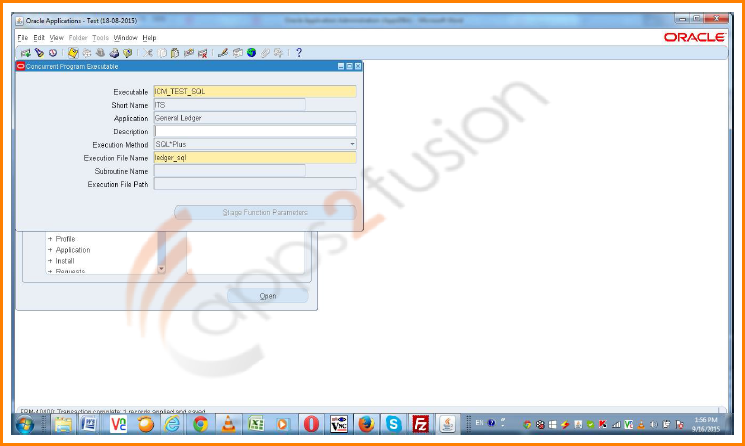
Give the above information
Save
Now define concurrent program
Responsibility: System administrator-->Concurrent-->Program-->Define
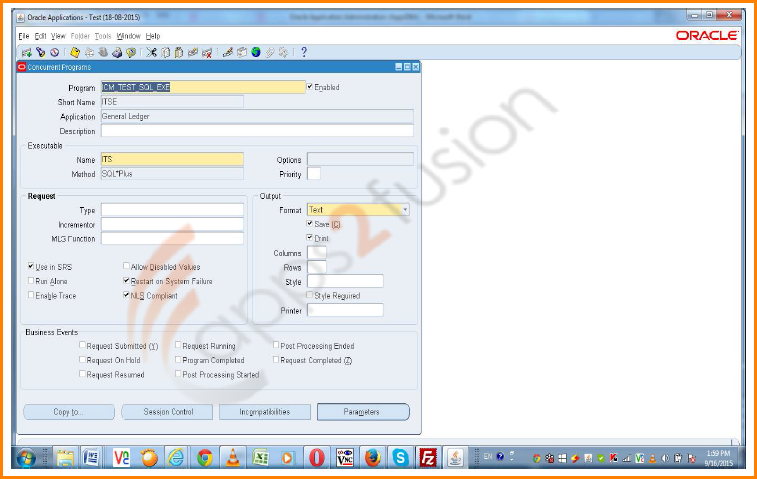
Give the above information
Save
How To Create Request Group
Responsibility: System Administrator-->Security-->Responsibility-->Request
Click-->Request
Give the Request Group Name
Application Name
Give the Concurrent Group Name( which we defined in the previous step)
Save Work
Now Add this Request Group to Responsibility
Responsibility: System Administrator-->Security-->Responsibility-->Define
Click on define
How to Create Responsibility
Create Responsibility
Assign the menu which we defined in previous steps(Icm General Ledger Test Menue)
Assign Request Group which we defined in the previous step
Save the work
Now assign this responsibility to user(in our case Noor Hassan)
Responsibility: System Administrator-->Security-->User-->Define
Save the work.
Now open the responsibility “TEST ICM” which we assigned to Noor Hassan User
Now we can see two submenu which we assigned during the menu creation.
How to run the Request
Go to View-->Request
Click on requests
Click on Submit a New Request
Click ok
Enter the request name
Click Submit
Click On No
Click on find
Click on View Output
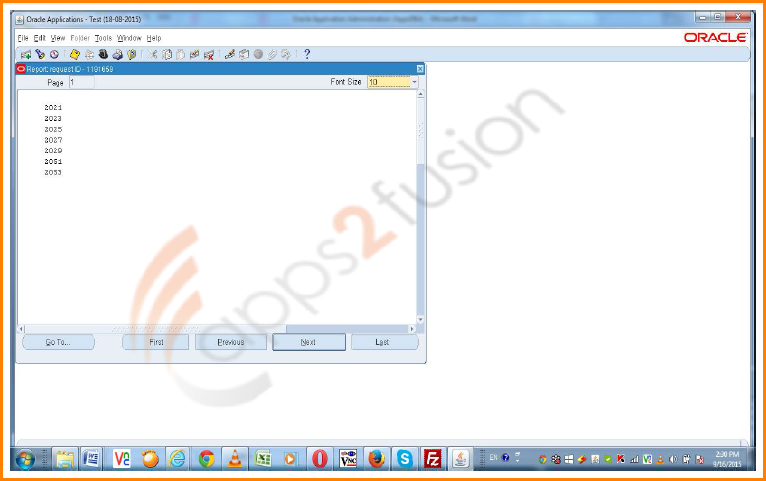
The output of the query showing the ledger ids
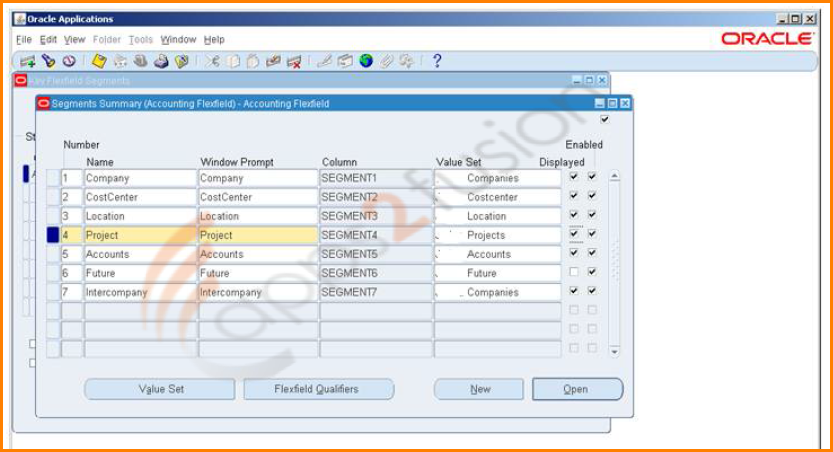
Flexfield Creation
Responsibility : System Administrator-->Application-->Flexfield-->Key-->Segment
Give the Flexfield Name
Click on Segment
Enter the information & Save
Now create value set
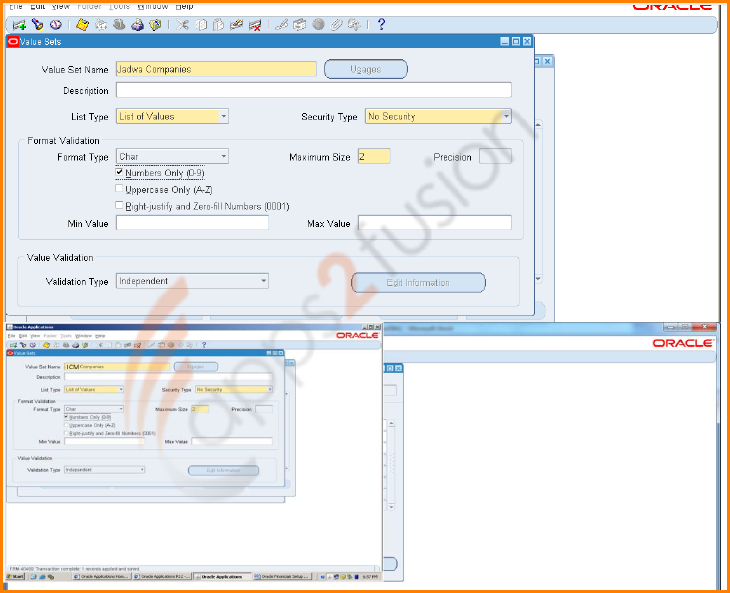
Create values set for all the segments and assign to the segments