
This tutorial deals with Fusion Payroll, and how it functions.
The topics covered in this tutorial are Accounts and Bank Setup, under which the following items are discussed:
-
Accounting Calendars and Primary Ledger
-
Banks and Bank Accounts
-
Creating an Accounting Calendar
-
Creating a Primary Ledger
-
Creating a Bank
-
Creating a Bank Account
Accounts and Bank Setup
Accounting Calendars and Primary Ledger
These are financial concepts. Fusion utilises a central module for this, which contains the details of the bank (branches, accounts, etc.). To create any bank account, this information is required.
First, an Accounting Calendar is created. These are not related to Payroll Periods. The task for creating an accounting calendar is Manage Accounting Calendars. Then, you have to specify the total number, frequency, and duration of the account periods to create the accounting calendar. If Oracle Financials are not used, any option on the calendar can be selected. There will be no impact on the other areas of the application.
Then, a Primary Ledger is created. The task to create one is Create Primary Ledger. Once a primary ledger is created, the Primary Ledger Scope has to be provided by the user. After this, a legal entity has to be assigned. This is where you can have a link between the ledger and a legal entity.
Banks and Bank Accounts
Once the accounting calendar and primary ledger are generated, the banks and accounts can be created. This can be done by using the task Manage Banks and Branch Details. To create bank accounts, the Create Bank Accounts task is used.
Here, the internal bank account details for your company can be defined. These are bank accounts that are debited when payments are made to the workers or third parties on behalf of your company. When creating a bank account, ensure that you select the Payroll checkbox. This will make sure that that particular bank account is associated with the payroll process in your company.
While creating an organisation payment method for electronic payments, such as NACHA and BACS, you can attach one or more of your company’s bank account(s).
Creating an Accounting Calendar
The following steps are to be followed to create your accounting calendar:
-
Go to the Manage Accounting Calendars task under Define Chart of Accounts for Enterprise Structures.
-
Click on the Create New Accounting Calendars icon in the following screen.
-
Enter the details of the Accounting Calendar (Name, Description, Start Date, Period Frequency, etc) and click on the Next button.
-
The Period Details of the Accounting Calendar will be shown. Click on the Save and Close button.
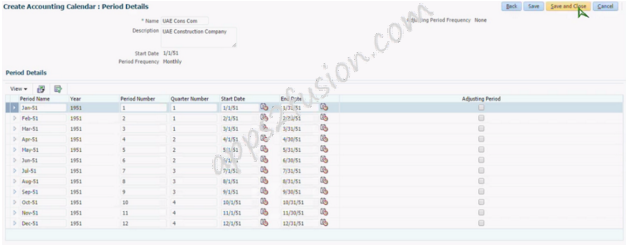
Fig. 1 - Period Details of the calendar
Creating a Primary Ledger
The next step is to create a Primary Ledger. Follow the steps below to do so:
Go to the Manage Primary Ledgers task under Define Accounting Configurations for Human Capital Management.
-
Click on the Create New Primary Ledger icon
-
Enter the details of the ledger in the screen that follows (Name, Description, Chart of Accounts, Accounting Calendars, etc.). Choose the Accounting Calendar that you created in the previous step and click on the Save and Edit Task List button.
To add a scope to the Primary Ledger, perform the following steps:
Click on the Select… link next to the Assign Legal Entities task.
-
Choose the Select and Add option.
-
Search for your Primary Ledger and select the relevant ledger. Click on the Save and Close button.
-
In the screen that follows, click on the Add Legal Entity icon.
-
Search for the legal entity and select the required Legal Entity. Click on the Apply button first, and then the Done button.
-
The Legal Entity will be assigned and will be shown in the screen that follows. Click on the Save and Close button.
-
You will now be able to see the legal entity that you selected under the Selected Scope column of the tasks.

Fig. 2 - Creating a Primary Ledger

Fig. 3 - The assigned Legal Entity is shown under Selected Scope
Creating a Bank
To add a bank and its branch(es), you will first have to add the task associated with it, using the following steps:
-
Click on the Add Task icon above the list of tasks
-
Search for “Manage Bank” and select the Manage Bank Accounts and Manage Bank Branches tasks under the results. Click on the Done button.
-
Go to the Manage Banks task, then click on the Create Bank icon
-
Enter the bank details and click on the Save and Close button.
-
Then, click on the Create Branch button under the Manage Banks task.
-
Enter the details of the branch and click on the Save and Close button.
-
Click on the Done button. Your bank and its branch have now been created.
Creating a Bank Account
To add a bank account, use the following steps:
Go to the Manage Bank Accounts task and click on the Create Bank Account icon
-
Enter the details of the bank account. To add the legal entity, click on Search… to search and add an entity.
-
After entering the details, click on the Save and Close button.
-
The bank account will be created. Click on the Done button.


