
Objective : In this article we will se how access policies are created in OIM and how auto provisioning is done .
Access Policies:
Access policies are a list of roles and the resources with which roles are to be provisioned or deprovisioned. Access policies are used to automate the provisioning of target systems to users. This is explained with the help of the following example:
A user belongs to multiple roles created in Oracle Identity Manager. Suppose a role Role1 have membership rule assigned to it. Membership rules can be designed based on the organization that the user belongs to, such as "Organization Name = "Org1". Roles can have access policies assigned to them. An access policies states which resource would be provisioned and/or denied to a role when the access policy is applicable. Therefore, when a user is created in the Org1 organization, it satisfies a membership rule and grants the Role1 role to the user. This in turn triggers the access policy assigned to the role and then provision or deny the resources mentioned in the access policy.
Terminologies Used in Access Policies
The following terminologies are associated with access policies:
Resource
A resource is a logical entity in Oracle Identity Manager that can be provisioned to a user or an organization in Oracle Identity Manager. For example, Microsoft Active Directory (AD), Microsoft Exchange, SAP, UNIX, and Database is modeled as a resource in Oracle Identity Manager.Resources are templated definitions that are associated with one or more workflows called Provisioning Process in Oracle Identity Manager, which model the lifecycle management, such as how to
provision, revoke, enable, and disable.Resources also have entities called forms associated with them. Forms represent a collection of attributes associated with the resource. For instance, a form associated with AD server includes
attributes such as SAM Account Name, Common Name, and User Principal Name. Forms also contain an attribute of type IT Resource (see "IT Resource Type" for details).Resources can be marked Allow Multiple, which would multiple instances of a resource to be provisioned to a user or an organization.
Account
Accounts are actual instances of a resource that are created and provisioned to a user or organization in Oracle Identity Manager. For example, an e-mail account on an Exchange server is an account (instance) of resource type Exchange.
Accounts have specific values for the attributes of the associated form.
IT Resource Type
IT resource type is a logical entity in Oracle Identity Manager used to model a physical target and all its attributes including (but not limited to) the connectivity information and the credentials required to connect to the physical computer. For example, IT resource type AD server is used to model an actual AD server.IT Resource Instance .These are actual instances of specific IT resource type that represent the actual physical target. They also have specific values for all the attributes of the physical target, such as IP address, port, user name, and password. Two physical AD servers in a deployment are represented by two instances of IT resource type AD Server.
Account Discriminator
Account discriminator is a collection of attributes on a form that uniquely identify the logical entity on which accounts are created. This term is sometimes loosely referred to as a target. For instance, for an AD server, an account discriminator can be a combination of AD server (an attribute of type IT Resource) and Organization Name.Typically account discriminators are attributes of type IT Resource.Attributes are marked as account discriminators by setting the Account Discriminator property of a Form field to True
Creating User & Roles :
1.Login to Orcale Identity Self Service control .
2.Login to System admin console .
Search for Application Instance OUD Server
Click OUD Server that appears tos see the details .Go to Organizations tab to see who all can use this application instance . When you click on the tab you can see that it is available to Top organization and includes sub organizations as well . So
all the users of top organization and sub organizations will be able to make the request for this application instance .
If you deselect the option for include sub-orgs , it will be available only to the top organization
By default all the roles will be available for Top organization and also by default Hieracrchy aware option will be selected.
3. Now we will create one users by going to Administration > User
Click on Create
Enter all the required Fields
First Name : John
Last Name : Apps2fusion
Organization : Services Department(search for service department)
User Type : Full-Time Employee
Account Settings :
User Login :john
Password : ******
Confirm Password: *****
Once all the required attributes are entered click on Submit . When we click on Submit , it will not go for approval since we
have created the user logging in as admin . If someone else other than admin creates the user it will go for approval.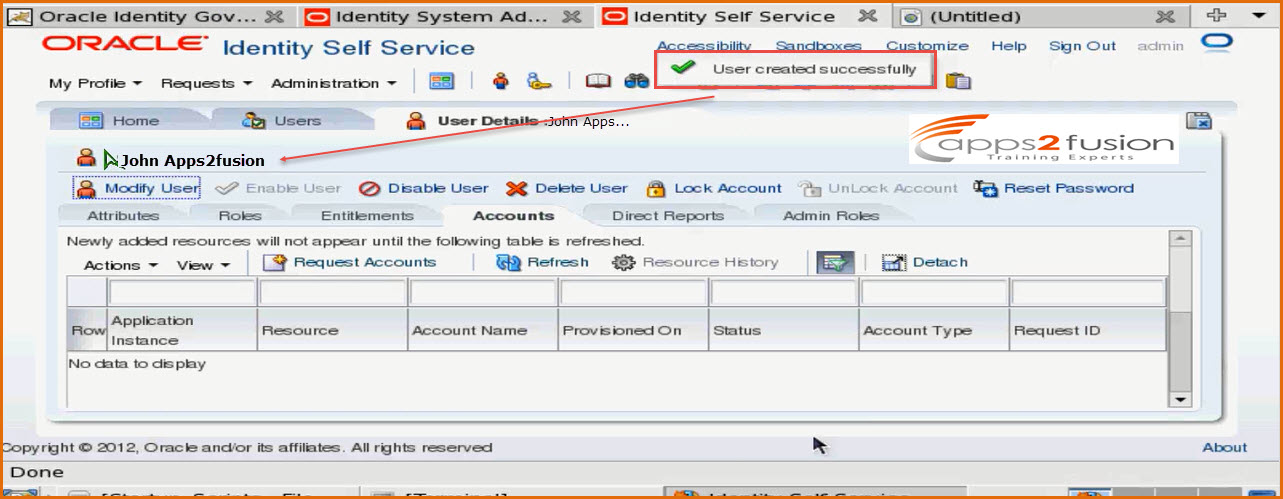
Now the user John Apps2fusion can request for accounts , roles . You need to make sure that role is available for this organization.
4. Now we will go ahead and create a role .
Create role click on Administration>Roles
Click on Create
Enter the Role Name & Display Name and click on Save
Name : TeamFusion
Display Name : Team Fusion
You can also optionally specify the owner of the role and ctaegory of the role while creating it .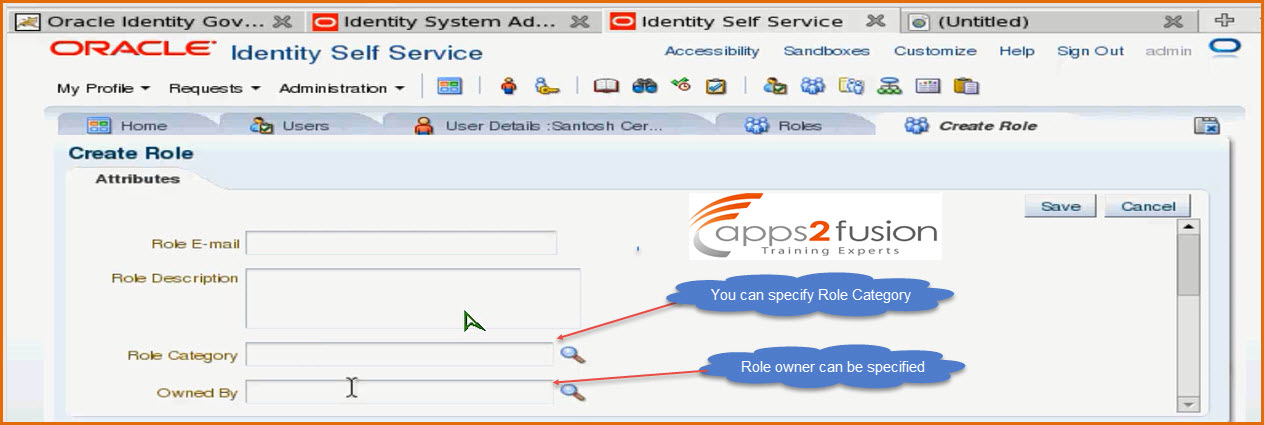
You can see that catgeory is default since was not specified while creating the role also the owner is the administrator since we created the role logging in as administrator .
Click on Hieracrhy Tab >Add if you wsih to add a parent role .
When you click on Members tab you will se that currently there are no members for this role .
Click on Organizations tab to see to which organizations this role is visible in the catalog , you can see that it is visible to all the users if the Top organization .
Now lets assume a scenario , where I dont want to create a user in OIM , whenever the new employee joins the organization hHR will enter the record in HR Application , once it ias added I want
that user to be created here in my OIM as well as provision email and AD which are the mandatory resource for all employees . For that we need to create one access policy and auto membership
rule .
-->Now we have a role created , we can see it by clicking on Roles tab and search for the Team Fusion role we created.
--> Click on the TeamFusion role that appears .
--> Click on Members tag for this role.
There are no members for this role, so we will click Add Rule button to add a role
Select the Country attribute and Click on Add
--> Enter the literal value for the Country as India and click on Add
--> Click on Save button to save this automembership rule .
So what we have done we have created role and an auto-membership rule . Based on the country this role will be added .
--> Now we will go ahead and modify some of the user attributes .
--> Enter the country value as India and Click on Submit button
--> You can see that the user John is a member of Team Fusion now
You can also see from the screen shit that the Team Fusion role is assigned indirectly not directly , so that means based on the role he has become the member of Team Fusion . Initially when the user is created there will be only one role i.e. ALL USERS . And based on rules other roles will be assigned .
Steps to create Access Policy .
For creating Access Policy you need to go to system admin console .
1. Click Policies>Access Policies
The popup window opens to create the access policies . If the user becomes the member of Team Fusion role then I want them to be provisioned to OUD automatically through access polciy .
Click on Create Access Policy button .
We will create the access policy and associate with role Team Fusion we created before .
Step 1: Create Access Policy
Access Policy Name : AP4TeamAmex
Access Policy Description : AP4TeamAmex
Provision : Without Approval
Proroity : 2 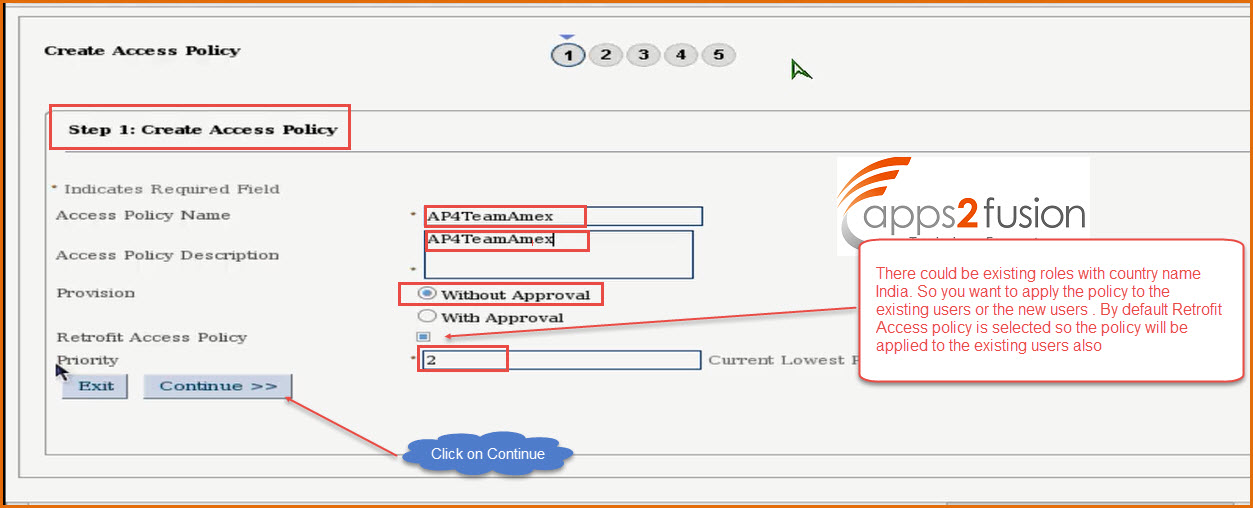
Step2 : Select Resources
I want to provision the user to OUD Server so Resource Object I will select is LDAP user and click om Add button . After LDAP user is added click on Continue button .
Click on Continue
We need to proivde details for resource LDAP User
First we have to select the server name , we click the search button and select OUD_ITR .
Rest details not required to enter , there is repopulate adapter which populates all the values into fileds by looking into OIM attributes , only one more thing you need to specify is the container , so click search button in for Container DN
Select the people container . Directory servers may have many containers one for customers , one for contractors , for busines partners etc .As of now we have only two group & people container .
Once selected click on Continue
It will ask you to Revoke or Disbale Flag just Click on Continue making sure that LDAP User is listed and selected .
Step 3: Select Resources that is to be denied by this access policy . So if you wish to deny resources you need to select the appropriate resource from the list and click on continue . Here we are not denying any resource since it doesnt lead to any conflicts .
Step 4: Select Roles for this access policy . We will search for the rol Team Fusion and select it and click on Continue
Step 5 : Verify Access Policy Information and Click on Create Access Policy
Acess Policy will be created successfully .
.
Now the window can be closed . In OIM there is one job that evaluates the access policies that runs periodically in the non peak hour . In OIM everything runs as a job . You can configure after how
much hours the JOb should run .So when the job runs then onky you will se that user will be provisioned to OUD.
To run the job .
1)Click on System Management>Scheduler
2) Search for the Job name (eval*)
3) Click Evaluate User Policies
4) You can see that this Job runs everyday at 12:1158 am.
Everytime it runs its grants access to the user .
5) Click on Run Now so that I could see user gets provisioned to the OUD .
Click on Refresh and see whether it is successfull or not .
Now we will go to OUD and check wheter the access is granted or not or else I can go to that John using Identity Self Service Console and Click on Accounts tab to check . Click on Refresh . You will be able to see that the user is provisioned with OUD Server.
Now if we try creating a new user with country as India and you will see that it will be automatically provisioned to OUD . So this is how Auto Provisioning is done .
Frequently Asked Questions :
1)If the the user whose country attribute is India later moves to USA , so the details of the user is also mdodified will all the rols be revoked from the user which were assigned due to Country India .
Answer: No the the access for the Resources will not be revoked or the roles assigned will not be revoked automatically even after the attribute is modified . But you can customize it to revoke the
access or do it manually . In the event handler you can write the code to revoke the access.
2) Does the Rule apply to all the users existing and new users .
Answer: Yes the rule will be applied to all the users existing and new users . Retrofit is associated with the access policy of the role.


Comments
topic. Do you know how to make your site mobile friendly?
My website looks weird when viewing from my iphone4.
I'm trying to find a template or plugin that might
be able to fixx this issue. If you have any recommendations , please share.
Many thanks!
Just wanted too say I love reading your blog and look forward tto all your posts!
Keeep up the fantastic work!
RSS feed for comments to this post