
Lead Management
Exploring Lead Ranking and Scoring Rules
Navigator => Setup and Maintenance Go to “Manage Sales Lead Profile Options”
Click on “Go to Task” Option
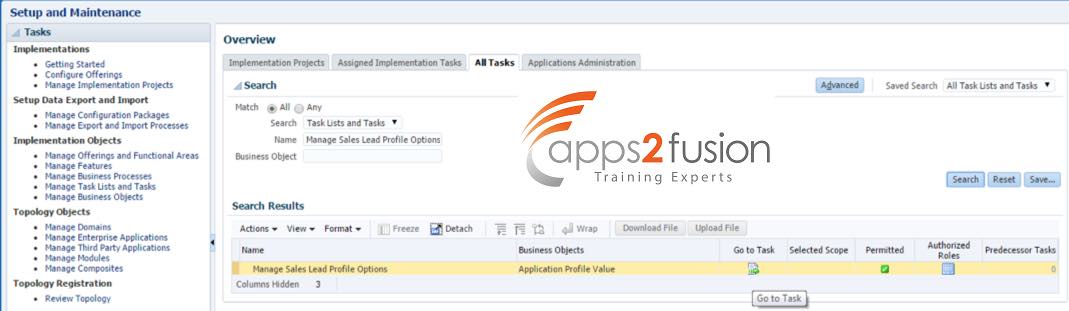
Search by profile option code %ASSIGN% and module as “Sales Leads” and click on MKL_LEAD_ASSIGNMENT_RANK_RULE and note the profile value is set to “Vision_SalesLeads_Grp” at Site level.
Then select “MKL_LEAD_ASSIGNMENT_SCORE_RULE” and notice that it is also set the same profile value (Vision_SalesLeads_Grp )
Assignment Rules
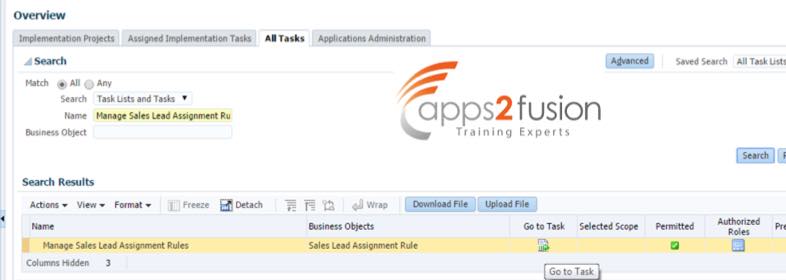
Navigator => Setup and Maintenance Go to “Manage Sales Lead Assignment Rules”Search under all tasks tab and click “Go to Task”
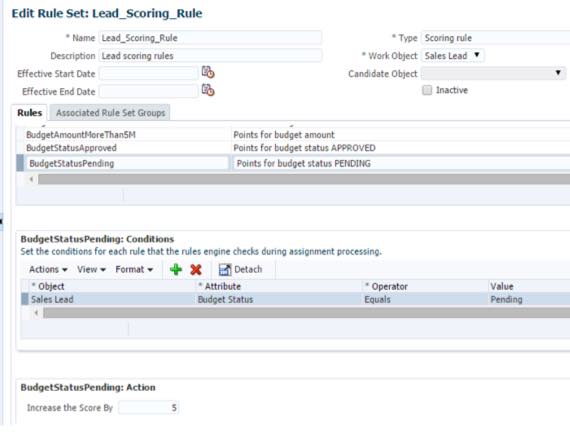
Locate and click “Lead Scoring Rule” and notice the Rules and Rule Set Groups
Notice in condition section the rule is checking for budget amount on the lead < or = 1,000,000
At the bottom in the Action section notice that the score is increased by 1.
Examine the other rules for budget amount and observe that the score is increased by 2 for the budget amount between 1 and 5 million and by 5 for budget 5 million or above.
Inspect the other scoring rules
In rule section select BudgetStatusApproved and in condition section notice that the rule is checking for Budget Status on the Lead “Approved”
In the Action section notice that the score is being increased by 10.
Observe the BudgetStatusPending rule and observe that its score is increased by 5.
In Rule section select “DecisionMaker”
In condition section notice that rule is checking for Decision Maker Indentification checkbox set to “True”
In Action section notice that score increased by 10.
Now in Rules Section select Time Frame 3months
In condition section notice that rule is checking for a Time Frame = 3 months
And in the Action section notice that the score is being increased by 10.

Same way check the condition and action values for the other time frames.
|
Time Frame |
Score Increased |
|
3 months |
10 |
|
6 months |
8 |
|
9 moths |
6 |
|
12 months |
4 |
|
15 months |
2 |
Likewise we can defined or modify these time frame as per business requirements and set the condition and action values.
Now select “Associated Rule Set Group”
Notice that the rule group is set to Vision_SalesLeads_Grp.
I have created with the name of (GTS_Vision_SalesLeads_Grp)
This verifies that this rule is run as part of the group specified in the profile option that you checked at earlier.
Click “Cancel”
Inspect the Ranking Rule likewise.
Locate the ranking rule notice that its type = Classification rule.
Select Rules tab in the Rules Section, Select RuleCold.
In condition section notice that the rule is checking for a score on the lead of <=11.
In Action section notice that the value being retuned is “Cool”.
Examine the other rules and observe that the ranking values correspond to the values in the table.
Your business requirements may be significantly more complicated.
|
Cold |
score <= 11 |
|
Warm |
score > 11 and < 25 |
|
Hot |
score >= 25 |
Now you will create a Lead that you score and rank.
Create Lead
Sign in Desktop UI.
Navigator > Lead Qualification
Click the Create Lead Link
Enter Name appropriate Lead name
Set a Primary Product

Select appropriate Account from the list
Click “OK”
Select a primary product from contact list.
Click “Save and Close”
Find the same Lead and “Edit” to test Scoring and Assignment rule.
In the “Basic Qualification section enter
|
Budget Amount |
2,000,000 |
|
Budget Status |
Approved |
|
Time Frame |
3 months |
|
Decision Maker Identified |
Checked |
Click “Save” to save the changes
Score and Rank the Lead
Expend show details
Click “Action” and select “Score”
Observe the score is = 35
Review the scoring rules at the beginning of the screens and verify that computed score should be 35.
Test the Ranking
Select Action > Rank
Observe “Rank” filed updated as “Hot”
Test the Rules
In Basic Qualification section uncheck “Decision Maker Identified” and save your changes
Again score the lead. Action > Score
Observe the score has dropped to 25.
Select Budget Status as “Pending” save changes score the lead again now test Rank the lead again
Action > Rank
Observe the lead is now ranked as “Warm”
Opportunity Management
Explore an Opportunity:
Sign to the Simplified UI and Navigate to Opportunities and make sure that “My Open Opportunities” is showing in show field.
Click “Create Opportunity”
Set Name “Pinnacle opportunity 05” enter Opportunity name as per business needs.
Open “Customer” list
Set Record Set = All record I can see
Set Name = Pinn and click “Search”
Select “Pinnacle Technologies” click “OK”

Click “Save and Close”

Add Revenue Item to Opportunity:
If the opportunity you created doesn’t appear search for and select the opportunity you created.
Click “Add” in Revenue
Select Type = Group”, Set product = Green Server, Set Quantity = 5, Set estimated price = 20,000
Then click out of the field and notice that, “Revenue” amount in the opportunity header is updated after adding the new revenue item.
Click “Save and Close”
Search and click on the Opportunity you just updated now.
Note the option in “Include in Forecast” and Win probably filed.
Now set sales stage = 03 – Building Vision and notice the “Win Probably” increased = 40.

Examine the Opportunity Team:
Click “Opportunity Sub tab” and notice that the creator of the Opportunity is only resource assigned.

Click “Save and Run Assignment” under Actions
Once the action is completed click “Summary” tab and then “Opportunity Team Sub tab” and verifies that additional resources have been added.
Note: These are members of the territories assigned to the Opportunity.

You can also explore additional actions available in Desktop UI by selecting more details from the action dropdown list.
Close the Opportunity by selecting “Won”
If required enter Primary Competitor, and Win/Loss Reason.
Click “Save and Close”
Create Product Group
Create Product Group hierarchy to be used as a catalog
Overview: Create top level Product Group and add several Subgroups to create a Product Group hierarchy.
Add several Products to Product Group, and then publish the hierarchy as Catalog.
Navigation: Sign in Desktop UI and Navigate to “Setup and Maintenance”
If necessary click “All Tasks”
Set Name = Manage Product Groups.
Click “Search” then “Go To Task”
Observe that there are numerous product groups displayed in left panel.
Select “Master Rollup” then click “Tree View” icon to display the product group hierarchy.
In right panel observe that, “Root catalog” is to “True” (Checked) this makes this product group at top-level product group.
Also observe that “Allow Duplicate Children” attribute is not set. If a product group allows duplicate children, then it cannot be assigned as the “Sales Catalog” for Oracle Sales Cloud.
Expend “Business Products”
Observe that “Root Catalog” is not set. This indicates that this group is a child group in the hierarchy.
Select “Storage” and observe that it has no child product group.
Click “Product” tab and observe that “Storage” product contains multiple products.
Collapse “Master Rollup” in order to create the “Root Level product group”
Click on “List View” icon,
Note: You can create product group only in the “List View”
In the Mange Product Group panel, Click “Create”
Enter details as per Business needs like,
|
Name |
CLD Products Groups 05 |
|
Display |
CLD Products Master 05 |
|
Active |
Checked |
|
Allow duplicate children |
Un-checked |
|
Root Catalog |
Checked |
Click “Save and Close”
Create a Child Product Group
In the left pane, select “CLD Product 05” you just created now.
Click on “Tree View” option.
Click in right panel, “Sub Group” tab then “Create” icon.
Enter sub group details as per Business needs like,
|
Name |
CLD Electronics 05 |
|
Display |
CLD Electronics 05 |
|
Active |
Checked |
|
Allow duplicate children |
Un-checked |
|
Root Catalog |
Un-checked |
Click “Save and Close”
Again in the Right pane click, “Create” icon and enter the details as per Business needs.
|
Name |
CLD Software 05 |
|
Display |
CLD Software |
|
Active |
Checked |
|
Allow duplicate children |
Un-checked |
|
Root Catalog |
Un-checked |
Click “Save and Close”
Click “Save” in upper right.
Add Subgroup to a Product Subgroup.
In left pane, Expend “CLD Product 05”
Select “CLD Electronics 05 “and add three Subgroups to the “CLD Electronics 05” Group.
|
Name |
CLD Servers 05 |
|
Display |
Premium Servers 05 |
|
Active |
Checked |
|
Allow duplicate children |
Un-checked |
|
Root Catalog |
Un-checked |
Click “Save and Close” Again click “Create” icon, and enter details.
|
Name |
CLD Laptops 05 |
|
Display |
Premium Laptops 05 |
|
Active |
Checked |
|
Allow duplicate children |
Un-checked |
|
Root Catalog |
Un-checked |
Click “Save and Close” again click “Create” button to create one more subgroup.
And enter details as per Business needs.
|
Name |
CLD Tablets 05 |
|
Display |
Premium Tablets 05 |
|
Active |
Checked |
|
Allow duplicate children |
Un-checked |
|
Root Catalog |
Un-checked |
Click “Save and Close” we have added “3” Subgroups likewise you can add several subgroups.
In the product group hierarchy pane, expend “CLD Electronics 05” you just created now and it should look like.
Add Several Products to a Product Group.
Normally you create or import products before you add then into a product group.
In left pane, select “CLD Servers 05”
In right pane, click “Products” tab. Then click “Add and Select” button.
In select and add products dialog box, set key = Sentinel
Click “Search”
Select “Custom Sentinel Power Server 1000
Click “Ok”
Again click “Add and Select” icon, Repeat to find and add “Sentinel Power Server (Blade) 5000
Click “Ok”
Repeat to find and add “Green Sever 1000”
Click “Save”
Publish the Catalog
In left panel, select “CLD Product 05”
Click “Publish” button to publish selected Catalog.
Confirmation message appears, click “Yes”
Click “Ok”
Click “Save and Close”
Note: Before users can access the catalog, this catalog must be enabled as the Oracle Sales Cloud Catalog.


Comments
RSS feed for comments to this post