
Initial Implementation Setup for Sales Fusion![]()
First Day in Sales Cloud
a)Verify Provisioned Settings
b)Configure Initial Settings
a)Verify Provisioned Settings
- Manage Enterprise HCM Information
- Manage Legal Address
- Manage Legislative Data Group
- Manage Legal Entity
- Manage Legal Entity HCM Information
- Manage Business Unit
- Manage Users (only one initial user provided)
- Manage Administrator Profile Values (Set default business unit)
b)Configure Initial Settings
- Accounting Calendar
- Currencies
- Geographies
- Sales Catalog/Products
- Customer Center
- Sales Dashboard
Accounting Calendar
You must set up the accounting calendar
- The calendar breaks down your fiscal year into accounting periods
- It is used across your enterprise for territory management and
- forecasting
- You want to set it up correctly because it cannot be changed once you have entered data
Accounting Calendar: Start Date
- Specify the first date of the period of the oldest historical data on which you will be reporting. Example: If you select January 1, 2010 as your first calendar date, then
- you would only be able to enter or import historical data associated with this date or more current
- You cannot add previous years once the first calendar period has been opened
Use one of these methods to determine your Start Date:
- Set the Start Date to one year before the date that your organization was created.
- Base it on your opportunities:
1. Find the earliest date of your open opportunities (or closed, if you want to capture closed opportunity history)
2. Then determine the beginning of your fiscal calendar for that year
3. Add one or two years before that to use as your start date
Accounting Calendar: Period Frequency
- The system generates periods based on your selection
- Options: 4-4-5, 4-5-4, 5-4-4, 4 Week, Weekly, Monthly, Quarterly, Yearly, or Other to set up a custom calendar.
- Set this to the lowest period you care about for forecasting, but no lower. This determines:
- The level of granularity available within analytics
- The level at which users view and adjust forecasting aggregates by the time dimension.
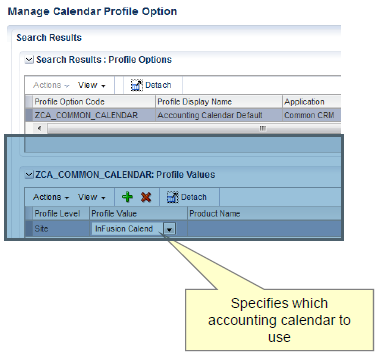
Accounting Calendar: Setup Tasks
- Go to the “Manage Account Calendar” to set up your accounting calendar
- Go to the “Manage Calendar Profile Option” to specify the Accounting Calendar for your organization
Currencies
All currencies are enabled by default
- Disable the currencies that your company will not use
- You cannot change a currency code after you enable the currency, even if you later disable that currency
- You can enter start and end dates to set a date range for the currency to be available to users
- If you leave Start Date blank, the currency is valid immediately.
- If you leave End Date blank, the currency is valid indefinitely.
Specify the default currency for your enterprise.
Create Sales User
- What You Must Do Before Creating Sales Users
- Creating Additional Resource Roles
- Creating Resource Organizations
- Designating a Resource Organization as the Top of the Sales Hierarchy
- Creating Rules to Automatically Provision Enterprise Roles to Sales Users
- Designating a Single User to Receive All Credential E-Mails
1. What You Must Do Before Creating Sales Users
Creating Sales Application users requires a bit more preparation than creating setup users. When you create sales application users either in the UI or by importing them from a file, you not only provision the permissions the users need to do their jobs, but you also build the organization chart for your sales organization. This means that you must set up not only the provisioning rules, but also the elements that the application will use to create the organization chart. These include the root of the organization chart and the job titles for each resource.
You are getting ready to create two types of application users. There are members of the sales team without any system administration duties. These are the salespersons, the sales managers, and the sales vice presidents. And there must be at least one sales administrator user who will set up and administer the sales territories and sales processes.
Setup Overview
- You must assign a title, called a resource role, to each sales user you create. The resource roles display right underneath user names in the resource directory and elsewhere in the UI.
You also use the resource roles as conditions in your provisioning rules. For example, you assign the Sales Manager job role to a user with the Sales Manager resource role.
Oracle provides standard resource roles, which correspond to the available job roles for sales, partner sales, and channel sales. For sales, these resource roles include:
- Sales Administrator
- Sales Manager
- Sales Vice
- Salesperson
If you want other job titles to display for your users, or if you want to provision some users with special privileges, then you must create additional resource roles using the Manage Resource Roles task from the Setup and Maintenance work area.
For example, you must create a CEO resource role if you want to include the CEO title in your organization chart. It's not one of the resource roles created for you.
You must also create additional resource roles, if you want to provide a small subset of resources with additional privileges. For example, if one of the sales managers in the organization is also in charge of maintaining territories and sales processes, you want to create a new resource role that you can provision with both the sales manager and the sales administrator job roles.
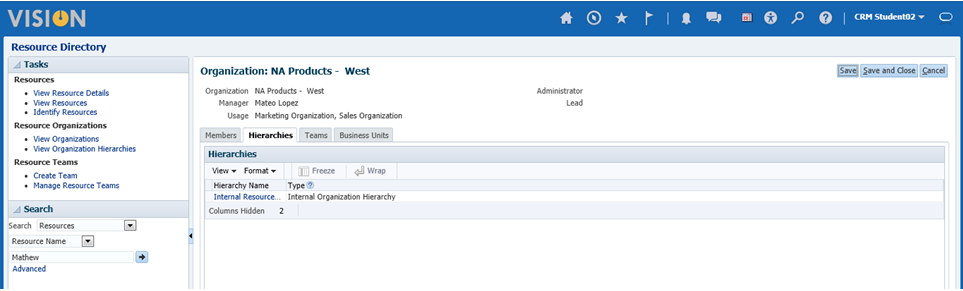
- Create a resource organization for the top manager in your hierarchy using the Manage Internal Resource Organizations task from the Setup and Maintenance work area.
You must assign resource organizations to all the manager users you create. All direct reports who are not managers inherit the organization. As you create users, the application creates an organization hierarchy that you can use to browse through the sales organization's resource directory.
- Next, you must designate the resource organization you just created as the top of your organization hierarchy, by using the Manage Resource Organization Hierarchies task in the Setup and Maintenance work area.
- Decide what job roles you want to assign to your users.
Remember that you are not restricted to assigning one job role to a user. For example, you will want to provision the sales manager in charge of determining sales territories and sales processes with the Sales Administrator job role in addition to the Sales Manager job role. This will enable this resource to perform the required sales setups.
You must create at least one user with the Sales Administrator job role to perform these setups.
- Using the Manage HCM Role Provisioning Rules task, set up the provisioning rules to automatically provision the appropriate job roles and the Resource abstract role to your users based on their resource role. You must create a provisioning rule for every resource role. This includes the resource roles Oracle provides and those you created.
When you create users, the application automatically sends e-mails with the sign-in credentials. Because you do not want members of the sales organization signing into your environment while you are setting it up, you will redirect these e-mails to one of the setup users. This is accomplished by entering the alternate e-mail address in the Edit Enterprise page, which you can access by using the Manage Enterprise HCM Information task from the Setup and Maintenance work area.
Create Sales User as a Sales Manager
Go to Navigator > Setup and Maintenance > search for task Manage Users
Click ‘Create’ the user.
- Enter first and last name
- Enter email id (the system will send temporary username and password)
- In the User Details section, leave the User Name field blank. The system will generate a username.
- Clear the ‘User Notification Preferences’ check box since email is not set up on our environment. If its set, the application automatically sends e-mails
- In the Employment Information section, set Person Type = Employee.
After the additional fields appear in the Employment Information section, set:
Legal Employer - US1 Legal Entity (it may vary)
Business Unit - US1 Business Unit (it may vary)
In the Resource Information section, set Resource Role = Sales Person
Set Reporting Manager = Bob Boyle.
Note: All Sales Cloud users must appear in a reporting hierarchy.
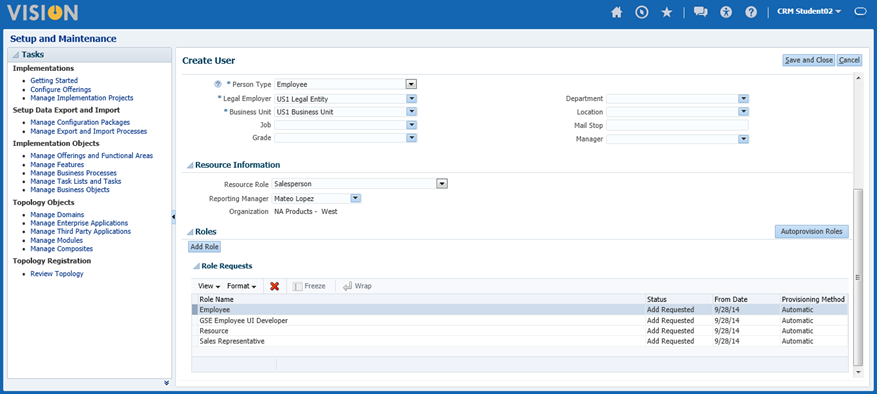
Since the new user is a manager, you must assign a new resource organization to the manager.
a.Click the drop-down list for Organization, and click Create
b. Verify the user was created
Resource Directory>View resource
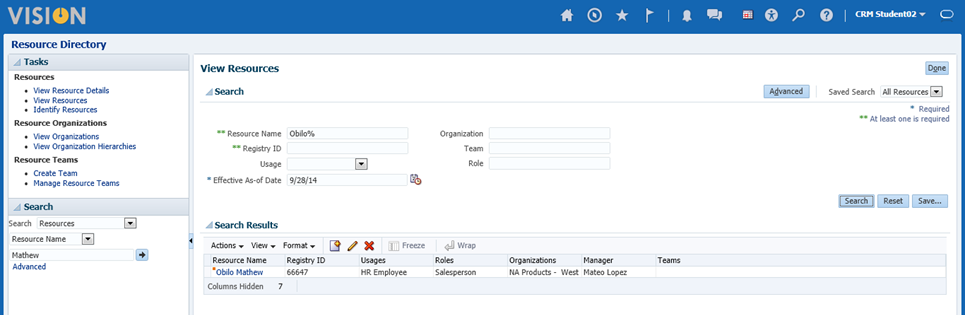
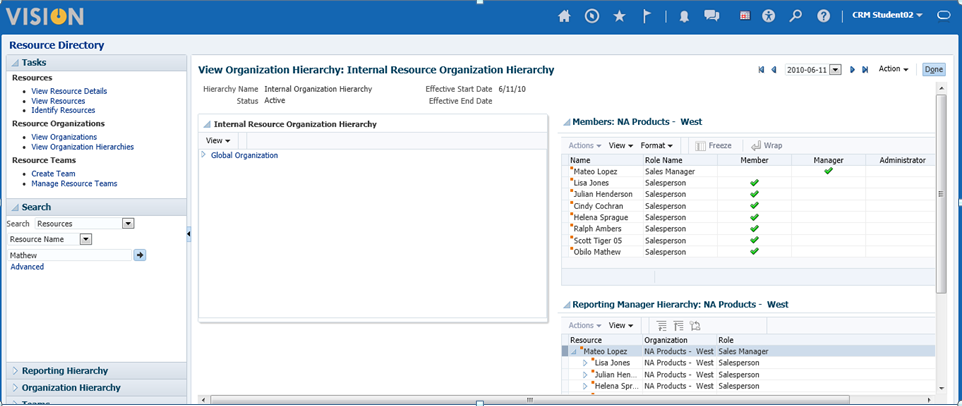
Select Navigator > Resource Directory
b. In the regional area, click View Resources.
c. In the Search section, set Resource Name = Mathew Obilo
d. Click Search.
e. In the Search Results section, drill down on the new manager record you created. There may be other similar records.
f. In the top Resource section, verify that the user was successfully created
Create Resource Role
Sign in to the desktop UI using your assigned login.
2. Go to this setup task: Manage Resource Roles
3. Create the resource role record.
In the Search Results section, click the Create icon. Set:
Role Name Sales Executive GTS
Role Code SALES_EXECUTIVE GTS
Role Type Sales
Deselect the Member check box.
Select the Manager check box.
This identifies the role as a manager role.
Click Save and Close
Click Done
4. Set up the rule that automates the provisioning of the enterprise roles to any new Sales Executive user.
a) Go to this setup task: Manage HCM Role Provisioning Rules
b) In the Search Results section, click the Create icon
c) Set Mapping Name = Sales Executive GTS mapping
d) In the Conditions section, use the list to set Resource Role = Sales Executive GTS
a) Add a role.
1) In the Associated Roles section, click the Add Row icon
2) Open the Role Name list
3) Click Search at the bottom of the empty list.
4) In the Search and Select dialog that appears, set Role Name = Sales to filter the list of ‘Sales’
5) Click Search.
6) Select Sales VP.
7) Click OK.
Notice that in the role name record, Autoprovision is selected by default
Repeat the above steps to add the Sales Manager Role
Repeat the above steps to add the Resource Role
Note: The abstract role named “Resource” must be added to all CRM resource roles
5. Verify the mapping assignments
In the Search section, set Mapping Name = Sales Executive GTS
Click Search.
Examine the roles that appear, in the Search Results section, and verify that there is a
mapping record for each role you added (Sales VP, Resource, and Sales Manager)
Click Done.
Create Organization
- While signed in as a setup user, search for the Manage Internal Resource Organizations task in the Setup and Maintenance work area.
- Click Go to Task.
The Manage Internal Resource Organizations page appears.
- Click Create.
The Create Organization: Select Creation Method page appears.
- Click Next.
- Enter the name of the resource organization in the Name field. This is the name that will be visible in the resource directory.
Note that:
- Each resource organization name you enter must be unique.
- The names do not have to correspond to any formal organization in your enterprise. They are there solely to create a resource directory.
- Do not use managers' names, as you may want to reassign the organizations to others later.
- In the Organization Usages region, click Add Row and select Sales Organization.
- Click Finish.
Create Rules to Automatically Provision Enterprise Roles to Sales Users
You must create rules to automatically provision Oracle Sales Cloud application users with the necessary enterprise roles to perform their jobs before you create users. The provisioning is based on the resource role that you assign to a user, so you must create a rule for every resource role you use in your organization. You must create rules to provision all of the resource roles provided by Oracle as well as all the additional resource roles you created, such as the CEO.
Creating a Provisioning Rule
- Sign in as a setup user.
- Navigate to the Setup and Maintenance work area and search for the Manage HCM Role Provisioning Rules task.
- Click Go to Task - The Manage Role Mappings page appears.
- Click Create - The Create Role Mapping page appears.
- In the Mapping Name field, enter a name that will help you identify the mapping, for example, Sales Vice President.
In the Conditions region, select the resource role you want to provision from the Resource Role list. For example, Sales Vice President.
- If you have implemented Oracle Global Human Resources Cloud Service, then enter Active for Assignment Status.
This additional condition ensures that the provisioned enterprise roles are automatically removed if the user is terminated in Global Human Resources.
- In the Associated Roles region, click Add to add the enterprise roles you want to provision. For the sales vice president, you add the following:
- Sales Vice President
- Resource
Note: Each sales resource must be provisioned with both the Resource and Employee abstract roles. You already created a rule to provision the Employee abstract role when you created setup users.
- Make sure the Autoprovision option is selected for all the enterprise roles.
Click Save and Close.


